We used to have this simple plastic mirror in our bathroom.
I bought a nice little closet that has a mirror for the bathroom , and decided to make some fun project with the girls.
So what we did is :
First of all i took a mirror and glued a cardboard that had all the future flowers and butterflies forms on it.
Then we made a papier mache , using a mewspaper for gluing it on the plastic of the frame iteself.
For the adhesivewe used the follwoing recipe :
Flour and water glue:
To make a flour and water glue follow these instructions:
Boil 5 cups of water in a saucepan.
In
a bowl, mix 1/4 cup of sieved flour with a cup of cold water. Mix to a
smooth consistency (a bit like making custard). When completely free of
lumps, add the mixture to the water in the saucepan. Gently boil,
stirring constantly for two or three minutes until the mixture thickens.
Allow to cool before using.
This will make a runny glue. If you prefer a very thick glue (or if you are in a hurry for it to dry) use this recipe instead:
Thick flour and water glue:
Use 1 whole cup of flour to three cups of water. Make using the same method as above.
In this very useful site : http://www.papiermache.co.uk/tutorials/getting-started-with-papier-mache/ we found also the recipe of pulp made of toilet paper and PVA glue, wheich what the 3d flowers and butterflies are made of.
Even my little dauther was exited and after this activity came and said that it was fun and we should do more of this.
It took a couple of days to dry , and a lot of days to paint , we just didn't find time for it. Even now, there are 2 flowers left unpainted.
Showing posts with label home decor. Show all posts
Showing posts with label home decor. Show all posts
Sunday, September 23, 2012

Tuesday, March 1, 2011
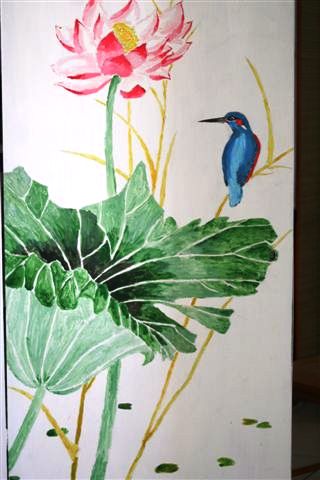
Revamp project- Chinese style painting over old formica closet
In our appartment we have two matching niches, located in the hallway. Both niches have shelfs and each makes a small closet. One of them had old , ugly dark brown formica doors , and other has no doors at all.
The doors pretty much looked like this:
 |
Before |
 |
| After- the bottom door |
Being on a budget afet moving in , i decided at least to paint it white , as it was causing our tiny hallway to look even smaller. So i painted the doors with one layer of primer , and two layers of white paint.
One day i decided to add something else , so i painted this picture on the bottom door (by the way i painted it with a regular acrylic colors, and it holds on very good , i even washed it couple of times ):
And the other picture on the top door :
 |
| After- the top door |
Need to take a better picture of the top door. The hallway is very tiny , so this is what came out.
 |
| More pics of bottom door |

Now , there is another dilemma: i have two such closets, located symmetrically on two sides of the hallway , and though the doors of the first one were ugly, but at least there were some doors. While that other closet has nothing to cover up all the mess and clutter inside it. Right now i put some plain curtain on it, but it doesn't look so good. It will cost me a fortune to order a new door for it .
So i need assistance from all the creative minds : please help me find some creative (and cheap) ideas .
I promise to think over very carefully any ideas you have and to show off later what came out of it.
Thanks a lot!!!
Thursday, February 24, 2011
Kids room murals
On the whole, i really wanted to make soem murals for the kids room, but couldn't find time, or strength to do that . Till the wall next to Princesse's bed started peeling (not without her help ...)
I'm not such a great muralist , but i'm pretty happy with the results, and the wall looks much better without peeled spots.

I'm not such a great muralist , but i'm pretty happy with the results, and the wall looks much better without peeled spots.
 |
| Here the problem is seen, beginning the mural |
 |
| The princess and the frog |
 |
| This little gnome is on the right side of the wall |
 |
| Princess and the gnome together |
 |
| The castle is on the top of the mural, this is where the gnome is heading to... |
 |
| Another princess ,i'm not so happy with her, but i needed to fill space next to the castle. |

 |
| This one i'm really proud of, it took me ages to paint it, it's located on the opposite wall , next to baby's crib The murals aren't finished yet, at least not on the wall next to the crib , and i have a feeling that by the time i'm done with it, the girls will become teenagers and demand other design for their room :) |
Subscribe to:
Posts (Atom)