
Sunday, December 9, 2012

Monday, November 12, 2012

Tuesday, October 9, 2012
Pic of the month -The Light of Music
This pic is taken by my 6.5 years old Big Girl
I think it's great ( even though i'm not very unbiased)
 I like the light and the composition is pretty good too, it has some ambiance about it.
I think it's great ( even though i'm not very unbiased)

A very well spent chol-ha-moed Succoth
The first place we went to was the old city- always picturesque, overcrowded, but in the holydays unbelievably so . So many people were there that we didn't even go to the Western wall, just visited the Temple Institute and went back home .
However, it turned out to be very interesting tour, with the treasures of the Temple exhibition, including Temple vessels exhibition ,priestly garments, Holy temple models, workshops for kids.
One drawback for us- it's a very interesting place to visit for kids and parents, but i would say for a kids older than 5 , so that my little ones had to be taken away by me in order not to make noise and disrupt the tour .
Anyway i'm always glad to visit the old city, even in the most crowded hours.
The other great place we went to was Har HaRuah , in close vicinity of Jerusalem. The girls at first didn't want to go to the hike, but only see the goats in the goats farm over there, but after a while they liked it very much- to look for different insects and lizards (which is what we always do ) and listen to the story their dad was telling about the people who lived in that place once (the place has some runis of ancinet farming).


And of course the goats are great , and their little ones are most adorable.
 The best trip we had was a whole family outing to Wadi Kelt river. It's one of the greatest hikes we had in the last couple of years. It can be hiked mostly in the water, which is great in that desert heat and ,wow that water is so cold! the kids didn't want to go out , even after turning blue , and the little one didn't want to go in, so he was carried in the baby sling the whole way.
The contrast of the desert surroundings and the cold river is just unbelievable.


However, it turned out to be very interesting tour, with the treasures of the Temple exhibition, including Temple vessels exhibition ,priestly garments, Holy temple models, workshops for kids.
One drawback for us- it's a very interesting place to visit for kids and parents, but i would say for a kids older than 5 , so that my little ones had to be taken away by me in order not to make noise and disrupt the tour .
Anyway i'm always glad to visit the old city, even in the most crowded hours.
 |
| Love the colorful shuk - bazaar in the old city |
 | |
| This is the coolest way to restore the cement between those old stones, i ever seen |
 | ||
| Old window, old stones. |


And of course the goats are great , and their little ones are most adorable.

The contrast of the desert surroundings and the cold river is just unbelievable.


Sunday, September 23, 2012
The mirror for kids room - Papier mache
We used to have this simple plastic mirror in our bathroom.
I bought a nice little closet that has a mirror for the bathroom , and decided to make some fun project with the girls.
So what we did is :
First of all i took a mirror and glued a cardboard that had all the future flowers and butterflies forms on it.
Then we made a papier mache , using a mewspaper for gluing it on the plastic of the frame iteself.
For the adhesivewe used the follwoing recipe :
Flour and water glue:
To make a flour and water glue follow these instructions:
Boil 5 cups of water in a saucepan.
In a bowl, mix 1/4 cup of sieved flour with a cup of cold water. Mix to a smooth consistency (a bit like making custard). When completely free of lumps, add the mixture to the water in the saucepan. Gently boil, stirring constantly for two or three minutes until the mixture thickens.
Allow to cool before using.
This will make a runny glue. If you prefer a very thick glue (or if you are in a hurry for it to dry) use this recipe instead:
Thick flour and water glue:
Use 1 whole cup of flour to three cups of water. Make using the same method as above.
In this very useful site : http://www.papiermache.co.uk/tutorials/getting-started-with-papier-mache/ we found also the recipe of pulp made of toilet paper and PVA glue, wheich what the 3d flowers and butterflies are made of.
Even my little dauther was exited and after this activity came and said that it was fun and we should do more of this.
It took a couple of days to dry , and a lot of days to paint , we just didn't find time for it. Even now, there are 2 flowers left unpainted.
I bought a nice little closet that has a mirror for the bathroom , and decided to make some fun project with the girls.
So what we did is :
First of all i took a mirror and glued a cardboard that had all the future flowers and butterflies forms on it.
Then we made a papier mache , using a mewspaper for gluing it on the plastic of the frame iteself.
For the adhesivewe used the follwoing recipe :
Flour and water glue:
To make a flour and water glue follow these instructions:
Boil 5 cups of water in a saucepan.
In a bowl, mix 1/4 cup of sieved flour with a cup of cold water. Mix to a smooth consistency (a bit like making custard). When completely free of lumps, add the mixture to the water in the saucepan. Gently boil, stirring constantly for two or three minutes until the mixture thickens.
Allow to cool before using.
This will make a runny glue. If you prefer a very thick glue (or if you are in a hurry for it to dry) use this recipe instead:
Thick flour and water glue:
Use 1 whole cup of flour to three cups of water. Make using the same method as above.
In this very useful site : http://www.papiermache.co.uk/tutorials/getting-started-with-papier-mache/ we found also the recipe of pulp made of toilet paper and PVA glue, wheich what the 3d flowers and butterflies are made of.
Even my little dauther was exited and after this activity came and said that it was fun and we should do more of this.
It took a couple of days to dry , and a lot of days to paint , we just didn't find time for it. Even now, there are 2 flowers left unpainted.
Pic of the month - Gossiping giants
I decided to get the blog going again, and not to be so lazy anymore :)
 So here is a pic of this month , one of the pics that i took a while ago, but like it still.
Taken in Jerusalem Zoo, at the golden hour , jest before the sun started setting down.

Taken in Jerusalem Zoo, at the golden hour , jest before the sun started setting down.
Thursday, April 19, 2012
Powerful
I'd like to share a picture that seems to show so much.
To day is the holocaust day and we have to remember and never forget.

To day is the holocaust day and we have to remember and never forget.

Sunday, April 10, 2011
My ever-growing to do list
There is so much stuff to do, and even more stuff i'm planning to sew, paint, repurpose in some future...
But not for long, for the upper part's fabric turned out to be a very delicate one, and after wearing once, it had a very disappointing split. So i decided to save that dress at any cost , and bought 2 additional fabrics: black velvet, to replace the torn upper part , and bordo lace for the skirt. I resewed it again , and now it turned out that i was too optimistic about my waist size... So i unstitched again the upper part from the skirt , and hopefully someday it will fit me well and be wearable. I promice to show off then. This one is ready !
 2.
2. The second one to make is the set of toys , that i was asked to sew for Princesse's kindergarten, similar to those on the picture. I really hope i'm up to the job. Thankfully this one is done !
3. To re-knit some baby cardigan for my friend. At least it can wait till next winter.
4. To sew a pet bed for our dog Don. I'm planning to make it out of fleece pieces i have left. Done too. Don is very happy.

9. To sew the curtains for the bedroom , and to make the headboard for our bed , preferably with the same fabric as the curtain. I choose the colours of yellow/orange for the curtain and headboard. I think i'll need also to sew a new cover for the bed , so that our dog can demolish this one too. I think that this kind of curtain will look great , and the wall colour on the picture looks pretty much like my bedroom. Done , but didn't come out as i wanted :(
10. A little curtain for the window from porch to the kitchen.
11. Some more stuff , that wasn't planned ,but came out - tutu skirt for my big princess, and twirly skirt for her too , that was sewn in an hour, cause she needed one in blue for kindergarden the next day , and all she had at home is pink of course.
1. So the fisrt one is to finish finally the dress i'm sewing for myself. This dress is an unfortunate one, as it started with a nice silk shirt, it's fabric i liked very much and didn't like how it looks on me. So i cut the shirt , added another silk , black , and came out with a black and white silk dress :

 2.
2.
5. The tradititonal baby blunket to knit, crochet , whatever, for the coming baby . As both girls have one each , the baby should have one. It's still in the process, proceeding very slowly :(
8. To sew for myself some maternity clothing. Not much oif the maternity clothing , but the maternity swimware is done. I saved some 250 Nis on that and found the color i liked too. Promise to add a picture.

10. A little curtain for the window from porch to the kitchen.
11.
Tuesday, March 1, 2011
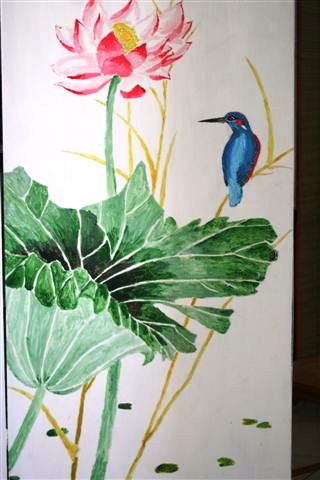
Revamp project- Chinese style painting over old formica closet
In our appartment we have two matching niches, located in the hallway. Both niches have shelfs and each makes a small closet. One of them had old , ugly dark brown formica doors , and other has no doors at all.
The doors pretty much looked like this:
 |
Before |
 |
| After- the bottom door |
Being on a budget afet moving in , i decided at least to paint it white , as it was causing our tiny hallway to look even smaller. So i painted the doors with one layer of primer , and two layers of white paint.
One day i decided to add something else , so i painted this picture on the bottom door (by the way i painted it with a regular acrylic colors, and it holds on very good , i even washed it couple of times ):
And the other picture on the top door :
 |
| After- the top door |
Need to take a better picture of the top door. The hallway is very tiny , so this is what came out.
 |
| More pics of bottom door |

Now , there is another dilemma: i have two such closets, located symmetrically on two sides of the hallway , and though the doors of the first one were ugly, but at least there were some doors. While that other closet has nothing to cover up all the mess and clutter inside it. Right now i put some plain curtain on it, but it doesn't look so good. It will cost me a fortune to order a new door for it .
So i need assistance from all the creative minds : please help me find some creative (and cheap) ideas .
I promise to think over very carefully any ideas you have and to show off later what came out of it.
Thanks a lot!!!
Thursday, February 24, 2011
Kids room murals
On the whole, i really wanted to make soem murals for the kids room, but couldn't find time, or strength to do that . Till the wall next to Princesse's bed started peeling (not without her help ...)
I'm not such a great muralist , but i'm pretty happy with the results, and the wall looks much better without peeled spots.

I'm not such a great muralist , but i'm pretty happy with the results, and the wall looks much better without peeled spots.
 |
| Here the problem is seen, beginning the mural |
 |
| The princess and the frog |
 |
| This little gnome is on the right side of the wall |
 |
| Princess and the gnome together |
 |
| The castle is on the top of the mural, this is where the gnome is heading to... |
 |
| Another princess ,i'm not so happy with her, but i needed to fill space next to the castle. |

 |
| This one i'm really proud of, it took me ages to paint it, it's located on the opposite wall , next to baby's crib The murals aren't finished yet, at least not on the wall next to the crib , and i have a feeling that by the time i'm done with it, the girls will become teenagers and demand other design for their room :) |
Wednesday, February 23, 2011
Recycle with kids- making toy kitchen out of cardboard box.
It was a rainy day , and the girls were bored stiff . I just thought to throw out the vacuum cleaner box , when it hit me -this is what they can occupy themself very nicely.
So we took:
the cardboard box
plastic glue
plastic bowl for the sink
botlle caps from the plastic bottles, for the oven and faucet knobs
spray bottle for the faucet.
glue gun
wrapping paper of different colours, whatever we had at hand
glue tape
4 CD's for the stove
First we glued the box , so it will not fall apart very soon (even though i'm not optimistic about the kitchen's chances of survival more than a month). We also glued together 2 pieces of cardboard and glued it to the box for "kitchen wall".
Then i made a hole for the sink, measured it to fit the plastic bowl.


We covered the whole thing with different wrapping papers.

 Faucet was a different problem,we decided to use a spray botlle for that , but the Baby sister loved it immediately and decided that it's too good a thing to waste it on some toy kitchen. So , after i hot glued the top part to the spray bottle to the cardnboar tube, covered with some nice paper , she came over and pulled it out. After gluing it for three times in a row i came out with the idea- i made the hole for the faucet a bit bigger and screwed it together with the spray bottle itself on the inside of the box. So now, even though the faucet wasn't tall and pretty , as the Princess wanted, but the Baby sister couldn't tear it anymore, not that she didn't tried.
For the stove we took 4 CD's , and glued then on top , and on them i glued some circles cut out of black plastic bag. Princess had drawn on them grids with the permanent pen , that is used to write on CD's.


So we took:
the cardboard box
plastic glue
plastic bowl for the sink
botlle caps from the plastic bottles, for the oven and faucet knobs
spray bottle for the faucet.
glue gun
wrapping paper of different colours, whatever we had at hand
glue tape
4 CD's for the stove
First we glued the box , so it will not fall apart very soon (even though i'm not optimistic about the kitchen's chances of survival more than a month). We also glued together 2 pieces of cardboard and glued it to the box for "kitchen wall".
Then i made a hole for the sink, measured it to fit the plastic bowl.


We covered the whole thing with different wrapping papers.

I cut out the oven door , and a little window in that door. Later on , i cut and glued some tranparent filing plastic bag , to create a fill of glass window of the oven.

 |
| This is the tap with a nice cardboard roll under it, lasted three seconds , till baby teared it out. |
For the knobs we used the plastic bottles caps, for the oven handle , some large beads. I fastened it together with a wire, using big beads on each side, so that the wire won't come out on either side.

And , of course , the little chefs need aprons and towels. So i made two frilled aprons for each cook, and cut some fabric for towels and sewn a ribbon , so it's possible to hang it on the hooks, tha i glued for that purpose. The little picture that is on the back wall of this kitchen is the piece of art , that my Princess made.
 |
| This is how it looks after a week of heavy use. |
 |
| Apron1 |
 |
| Apron2 |

Thursday, February 10, 2011
Why does it take a minute to say hello and forever to say goodbye?
Very sad news. Last week we lost someone very close to our heart - my father-in-law, my husband's father , who was a trully remarkable , kind, and optimisitc man.
So many people came to the funeral to see him on his last way , it is easy to see how much was he loved and appreciated by everyone.
It is astounding how even when person was sick , his death comes as shock to everyone.
Being very close to his father , my husband has a very tough time now to accept the fact, but he has been inspired by his father's death to a good deeds and to trying to be a better man.
He was a very easy going, satisfied person, had a lived his life completely honestly, completely successfully, simply completely.
May he rest in peace.
Tuesday, January 11, 2011
Past fun activity - Building a fridge box house
This house was built by mom and dad and decorated by princess from a fridge box .
For a long while it was a favorite toy of Princesse's ,and of all her friends, and there are even some "followers" among our friend that built something similar (and more sophisticated) for their kids.
Then we got to the box itself .First we cut out some upper part of the box, so it won't be so high , and made the pointed front part for the roof.
We cut out the roof and glued it to the house with hot glue gun .
Then we cut the door and windows ,but didn't cut it out completely , and left the window/door attached, so that it can be opened and closed.
Then there was the wallpaper or in our case wrapping paper turn. I think i could also just paint the house , but then we would need a lot of paint and to put a 2-3 layers of it.
 I also glued to the window shatters some green paper.
 and glued on the red paper for the roof
 Danny made this cool balcony.
 The landlady is working hard on her new home decor.
For a long while it was a favorite toy of Princesse's ,and of all her friends, and there are even some "followers" among our friend that built something similar (and more sophisticated) for their kids.
What we had:
box cutting knife
fridge box
some wallpaper or wrapping Paper
some red paper for the roof
hot glue gun
plastic glue - a lot of it
(Well, we didn't have the glue , so i made the flour and water glue , that is usually used for papier mache :
1 whole cup of flour to three cups of water. In a bowl, mix the flour with a cold water. Mix to a smooth consistency (a bit like making custard). Gently boil, stirring constantly for two or three minutes until the mixture thickens.
Allow to cool before using.)Then we got to the box itself .First we cut out some upper part of the box, so it won't be so high , and made the pointed front part for the roof.
We cut out the roof and glued it to the house with hot glue gun .
Then we cut the door and windows ,but didn't cut it out completely , and left the window/door attached, so that it can be opened and closed.

Then there was the wallpaper or in our case wrapping paper turn. I think i could also just paint the house , but then we would need a lot of paint and to put a 2-3 layers of it.


Thursday, January 6, 2011
Those kids nowadays, the games they play...
My Princess went yesterday to play with her friend . On her way back she told exitedly what a nice games they played - they played doctor and mom and baby , her friend was the doctor , she was the mom and the baby had a swine flu....


Monday, January 3, 2011
Refashion: Plain skirt into favorite
I bought a really cheap plain skirt for my princess. She wore it as is, but i decided that it would be a great thing to remake (and it wouldn't be too bad it i would screw it up). I thought that it needs some eye-catcher.
First of all i made the white roses , using this great tutorial in Tea Rose home blog: http://tearosehome.blogspot.com/2010/01/tutorialruffle-shirt.html . I attached the white roses and decided that it's not enough, so i added 2 pink ones.
 It looked nice, but i felt that there still something missing , so i cut strings of white and pink fabric and attached it: first made white ruffles string and attached it, Then attached pink string as straight ,without ruffles.
I liked the result and someone was very exited to wear it next morning to kindergarten...

First of all i made the white roses , using this great tutorial in Tea Rose home blog: http://tearosehome.blogspot.com/2010/01/tutorialruffle-shirt.html . I attached the white roses and decided that it's not enough, so i added 2 pink ones.

I liked the result and someone was very exited to wear it next morning to kindergarten...

Thursday, December 30, 2010
Refashion: Cut 'n' knit old jeans into skirt
I had a pair of kids jeans that my Princess wouldn't wear.
Generally , she prefers skirts, so i decided to remake it into a skirt.
I cut off the legs pretty high up , just under the zipper.
The knitted part is done by the pleated skirt pattern:
1si round: P2, k10, [p5, k10] to last 3 sts, p3.
Rep this round until panels measure 3" (total length is 5").
Next round: P2, k2, m1, k6, m1, k2, [p5, k2, m1, k6, m1, k2] to last 3 sts, p3.
Next round: P2, k12, [p5, k12] to last 3 sts, p 3.
Rep this round until panels measure 6" (total length is 8").
Next round: P2, k2, m1, k8, m1, k2, [p5, k2, m1, k8, m1, k2] to last 3 sts, p 3.
Next round: P2, k14, [p5, k14] to last 3 sts, p3.
Rep this round until desired length.
Cont in this manner, inc two stitches in each panel every 3" until each panel has 22 knit sts.
Rep this round until desired length.
Work four rounds of garter stitch.
BO all stitches loosely.
Then the jeans part and the knitted part were sewn together.
Adding some decor was neccessary in this case, so i crocheted the flower and a bird, and embroidered it on the upper , jeans part.
 For flower i used a pattern :
Using a size H hook, chain 4. Join the end to the first chain with a slip stitch to form a ring.
Round1:(single crochet in the ring, chain 3) 6 times. Again, join the last stitch to the first single crochet with a slip stitch.
Round2: (single crochet, chain 1, 3 double crochets, chain 1, single crochet) in each space created by the chain 3.
Round3:Now you begin working in the back of the flower you have started creating. (single crochet around the first spoke, then chain 4) 6 times. Join last stitch to first stitch with a slip stitch.
Round4:(single crochet, chain 1, 5 double crochets, chain 1, single crochet) in each space created by the chain 4.
Round5:Repeat round 3, but chain 5 instead of 4. Join last stitch to first with a slip stitch and weave in ends.
If you want to add another layer of petals, repeat Round 3, increasing the number of stitches in the chain by one, and Round 4, increasing the double crochets by two.
The bird bas based on crocheted circle.
 The favorite part of my Princess' is the "belt", she loves them . She thinks it came out ok...
Generally , she prefers skirts, so i decided to remake it into a skirt.
I cut off the legs pretty high up , just under the zipper.
The knitted part is done by the pleated skirt pattern:
1si round: P2, k10, [p5, k10] to last 3 sts, p3.
Rep this round until panels measure 3" (total length is 5").
Next round: P2, k2, m1, k6, m1, k2, [p5, k2, m1, k6, m1, k2] to last 3 sts, p3.
Next round: P2, k12, [p5, k12] to last 3 sts, p 3.
Rep this round until panels measure 6" (total length is 8").
Next round: P2, k2, m1, k8, m1, k2, [p5, k2, m1, k8, m1, k2] to last 3 sts, p 3.
Next round: P2, k14, [p5, k14] to last 3 sts, p3.
Rep this round until desired length.
Cont in this manner, inc two stitches in each panel every 3" until each panel has 22 knit sts.
Rep this round until desired length.
Work four rounds of garter stitch.
BO all stitches loosely.
Then the jeans part and the knitted part were sewn together.
Adding some decor was neccessary in this case, so i crocheted the flower and a bird, and embroidered it on the upper , jeans part.

Using a size H hook, chain 4. Join the end to the first chain with a slip stitch to form a ring.
Round1:(single crochet in the ring, chain 3) 6 times. Again, join the last stitch to the first single crochet with a slip stitch.
Round2: (single crochet, chain 1, 3 double crochets, chain 1, single crochet) in each space created by the chain 3.
Round3:Now you begin working in the back of the flower you have started creating. (single crochet around the first spoke, then chain 4) 6 times. Join last stitch to first stitch with a slip stitch.
Round4:(single crochet, chain 1, 5 double crochets, chain 1, single crochet) in each space created by the chain 4.
Round5:Repeat round 3, but chain 5 instead of 4. Join last stitch to first with a slip stitch and weave in ends.
If you want to add another layer of petals, repeat Round 3, increasing the number of stitches in the chain by one, and Round 4, increasing the double crochets by two.
The bird bas based on crocheted circle.

Kids fun activity - what came out of broken crayons
We had a big box of old crayons of various kinds, most of them broken. Both girls love playing with them, BUT there were two problems:
First of all, baby sister is very persistent about pulling those things into her mouth and cannot be distracted with other toys. Second of all , both find it a great idea to spread those pieces all over the house and i got a bit tired of stepping on it or finding it in my shoes.
So then came a solution that i found in one of the craft blogs:
-we broke those crayons into even smaller pieces
- all those pieces were inserted into some old rusty baking molds i used once for muffins.
- put that stuff into the oven for 15 minutes on 120 C (~ 250 F)
Important! It comes out of the oven very hot and a lot of patience needed.

First of all, baby sister is very persistent about pulling those things into her mouth and cannot be distracted with other toys. Second of all , both find it a great idea to spread those pieces all over the house and i got a bit tired of stepping on it or finding it in my shoes.
So then came a solution that i found in one of the craft blogs:
-we broke those crayons into even smaller pieces
- all those pieces were inserted into some old rusty baking molds i used once for muffins.
- put that stuff into the oven for 15 minutes on 120 C (~ 250 F)
Important! It comes out of the oven very hot and a lot of patience needed.
And they're drawing
Subscribe to:
Posts (Atom)